Identify Your Goals
Before shooting your small business’ professional-quality video, plan it out! Define your objectives and goals. This will guide you in deciding what type of video to make, what content to include and what equipment you need. Applying the right strategy can help you get a great-looking video at a reasonable cost.
Here are the steps that can help you get there.
Set a budget
It is key to make a budget before creative decisions, as every project needs one. Estimate the cost of production, equipment rental and post-production. This will keep your project within scope and budget without compromising quality.
Factors to consider for your budget:
- Type of video content: Live action or animation?
- Production needs: Specialized equipment or crew?
- Post-production services: Editing and sound mixing options.
- Marketing services: Ads, website fees.
These factors can help you find the best fit video content for your small business budget.
Determine the purpose of the video
What do you want to achieve with your video? Introduce a product? Promote a service? Showcase a tutorial? Make sure your goals are realistic and match your budget. Start with achievable goals, then grow.
What kind of visuals will best convey your message? Animated graphics? Footage? Think about this before any filming or editing.
Will this be a one-time project or part of an ongoing marketing campaign? A long-term plan helps consistency and strengthens the message. Knowing the cost beforehand helps with budget decisions. Avoid surprises later.
Find the Right Video Production Company
Discovering the ideal video production company to collaborate with can unlock the door to achieving professional-grade videos at a small business cost. It requires research, since there are numerous video production companies to select from, which provide different services and prices.
By spending time understanding the diverse services, you can pinpoint the right one for you.
Research video production companies
Researching video production companies is essential before signing a contract. Check out their past projects and portfolio on their website. Ask for references or referrals from past clients to get honest feedback about the company. Discover their expertise or specializations that could be useful for your project.
Confirm the video production company’s pricing, delivery schedule, and any other questions you may have. Make sure to read any terms and conditions related to delivery, payment, copyrights, or changes requests. Invest time in learning more about your potential partner to ensure the project is done according to spec, within an agreed upon budget and timeframe.
Ask for quotes
Ask for a quote from a video production company before you commit. Include the cost of quality equipment, scriptwriting and editing services, graphics design, studio space and additional features. Make sure you are clear about the kind of video you need.
Compare prices and don’t forget to consider reputation and customer service. This can make all the difference when it comes to professional quality videos on a small budget.
Check references
Before you sign a contract, ask the video production company for references from current or past customers. They might not give out names, but they can tell you what projects they’ve done. Also, check their website for customer testimonials. See how long they’ve been in business. Look at their videos. Are the testimonials positive? If yes, they’re a great pick.
Online reviews and feedback from people who have used the company are great too. Do your research so you can pick the right video production company. They’ll create amazing videos that fit your budget.
Create a Storyboard
Storyboarding is key for creating top-notch videos with a tight budget. It assists you in planning the entire video from beginning to end. This makes using your resources simpler and more productive. Plus, it gives you the opportunity to be imaginative with your concepts.
In this section, we’ll explore the process for making a storyboard. And, how it can help you create videos that look like a pro made them.
Brainstorm ideas
Before creating your storyboard, brainstorm ideas to portray your message. Who are you targeting? What action should they take after watching? Make a list of potential scenarios and shots. Like any good script, begin with an introduction that grabs attention.
Map out scenes to move the narrative until a logical conclusion. Visual effects and voice-overs can add interest or provide extra info.
Even if you have a limited budget and small team, an effective video is possible with planning and creativity! Write down ideas as they come. There are no wrong answers. Use sound storytelling principles and visuals tailored to your target audience. You can take advantage of video marketing power without breaking the bank.
Develop a script
Before you start filming, create a script. It’ll provide a guide and keep things consistent. Consider these points: the main message, important info, target audience, and tone.
Set up the script with dialogue, visuals, music, and sound. Narrative scripts need context without too much info or leaving out details. Storyboarding helps visualize and plan scenes. Transitions between scenes can add special effects and music. Find tracks before scripting so words match the melody.
Leave room for improvisation during filming. Be open-minded when reading lines during rehearsal; it could lead to major improvements!


Create a storyboard
Creating a storyboard is a must for making professional-quality videos within a small business budget. It’s a written guide of what you want to say and how you will say it. This will give your video an organized look, feel, and message that makes it professional.
Start by writing down ideas for the story before breaking it down into shots. Use arrows or lines to mark each sequence transition. Then, draw out what each scene looks like and what is happening. For example, draw characters talking if there’s dialogue, and draw any physical action like running or dancing.
Write down notes about which roles are needed for each part, the emphasis on close-ups and wide shots, which camera angles would be best, and any extra expenses like props.
By following these steps, you can create amazing visuals and improve the quality of your videos without breaking the bank!
Pre-Production
Pre-production is essential for making any video! It means planning and getting ready for the video. This includes scripting, drawing storyboards, choosing actors, searching for a place to film, and organizing the schedule.
Pre-production is a key factor in the success of a video. So, plan and budget properly in this stage.
Secure any necessary permits
Secure any permits before you begin production. This could save time and hassle. You might need various types of permits, for example, film permits, location permits, music licenses and security certificates. Research local regulations that may affect when you can film. This includes noise ordinances and workmen’s compensation policies, if needed.
For more complicated projects, it’s useful to hire an experienced producer or line producer. They can help with the paperwork and file for any permits. Each permit must include insurance coverage for you and your crew in case of any issues during filming.
Gather props and actors
Before you shoot, consider the visuals. You may not need many props, but you should get the ones you do need. This could include posters or other visuals related to your video. If you’re using actors, pick them before shooting and arrange for makeup and wardrobe. You can find actors locally or use services like casting networks. Make sure you trust their performance before booking.
Plan everything in advance of the shoot: script, shots, timeline for each scene, camera movements, and lighting setups. This will help the shoot go smoothly and limit retakes.
Prepare a shooting schedule
Before you start, draft a script & shot list. This makes the planning process easier. Calculate how much time you have at each location, and don’t forget to add travel costs.
Prioritize essential shots that are needed for the story, over optional extras. Rehearse with actors, if required. Take notes on what works best. Make sure everyone knows their call time, so production runs smoothly.
You may not have time to shoot everything in one session. That’s ok! Make sure nothing urgent is left undone, so production won’t take longer than necessary.
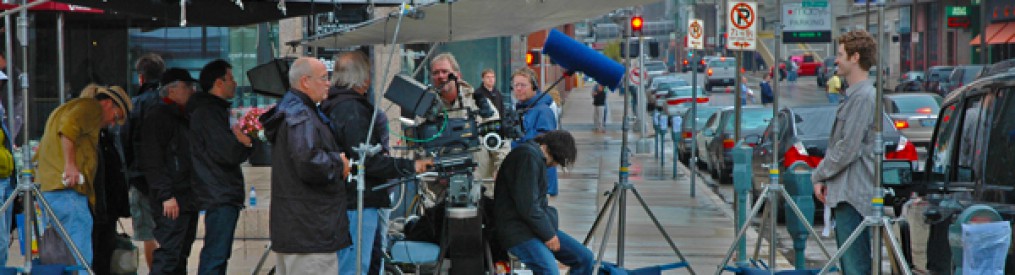
Production
Creating a video? The production stage is key. It covers all the work done before shoot day. Planning, scheduling and budgeting? Got to do it.
With a small budget, it’s vital to get the best quality result. Here are some tips and tricks to get professional-quality videos on a small business budget.
Set up the equipment
Setting up equipment is vital for filming your own videos. Think about what type of gear you need based on the size of your project. If you’re limited by a budget, get the must-haves like cameras and mics. Prioritize the costs that could make a creative difference, such as lenses if you’re shooting high quality vids. Necessary equipment includes: a camera, lens, microphone, audio recorder, tripod and lights (if indoors).
Also consider software. Buy or rent editing software that has features to meet your vision, depending on your budget and complexity.
When filming, use best practices to capture footage. Check that everything is set up correctly on location before shooting. Make sure there is enough light and sound levels are good, so dialogue recordings are audible when editing. And avoid compilation shots, unless they serve a purpose. This will cut down post-production time by eliminating redundant footage during movie assembly in editing.
Shoot the footage
Quality footage is essential for great videos. When shooting on-location, think about lighting, sound, and composition. If you’re in a studio or at home, use tricks and tools to set up the space.
When planning shots, consider angles and camera movements. Close-ups, wide shots, over-the-shoulder shots, and tracking shots can build tension or highlight elements. If using multiple cameras, make sure all necessary footage is captured.
Professional cameras require extra equipment like audio mics and lenses. Shop around for good deals on equipment rentals.
Monitor the audio
For a great video, audio should be top priority. Poor sound ruins even the most expensive cameras and lighting. Here’s how to make sure your final product sounds just as good as it looks:
-Always use a professional mic. Boom mics work well but lavaliers have their place too.
-Listen on headphones or a speaker as you record. Ensure levels don’t distort with normal speaking volume.
-If possible, record on two devices. This way if one fails, you have a backup.
-Bring on sound technicians for professional optimization and techniques like EQ and compression.
-And always remix and balance sound in post-production. This includes ambient sound, speaking parts, music, and any special cues.
Post-Production
Post-production is the last step in video creation. Editing the footage, adding music and graphics, plus checking the technical lighting and audio quality are all part of the procedure. To achieve professional-quality videos, both pre- and post-production pieces are necessary.
Small businesses can use post-production to get the most out of their video project, for a small price. To learn more about post-production and how to create stunning videos with a limited budget, read on!
Edit the footage
Editing and post-production are essential to making professional-grade videos on a budget. Editing is arranging the raw footage and audio gathered during production so it can be changed and put together in imaginative ways to tell a story.
Software is important for editing, but there are also special technical skills needed for post-production. These include:
- Sorting through raw material and deciding which components to use for editing – this may involve taking out unwanted pieces or moving clips around for better narrative.
- Making visual elements (such as text) with either downloadable templates or specific software packages like After Effects.
- Joining clips, altering timing, and changing video formats.
- Adjusting volumes, adding sound effects, inserting voiceovers or music.
- Developing unique palettes while also fixing contrast problems in shots.
- Developing transitions, motions/animations to give viewers a more dynamic experience.
Add graphics and music
Graphics and music can elevate the quality of your videos. Simple titles and lower thirds to complex infographics, logos and text animations can give your content a unique look. Music adds emotion that natural audio cannot.
You can get royalty-free music for as cheap as $8 per track. Adobe Spark and Biteable are services for creating visuals without needing design experience. Hire a designer or animator for custom projects. Motion graphics packages start around $200-$400. If you’re in a budget, pre-made templates and stock motion graphics libraries are cost-effective options to take your productions up a notch.
Export the finished video
Finished with post-production? Time to export that video! Exporting compresses the file to a size and format that can be shared easily. It creates digital files optimized for different devices, like TVs, computers, smartphones, and tablets.
When exporting, choose a file format. *.mp4 is good for iOS devices, but it depends on usage. Resolution and bitrate also matter. 720p resolution (1280×720) is good for normal display devices, but 4K TVs need 1080p (1920×1080) or 4K (3840×2160).
Once all settings are chosen, export the file. Check it carefully before uploading!

